Showing posts with label AG #3 - ISO Standard Stout. Show all posts

Monday, July 5, 2010

AG #3: ISO Standard Stout - First Taste Test

Having tasted the sample of my ISO Standard Stout when I was kegging it I was really looking forward to tasting the beer once it had been carbonated. The stout has been force carbonating for five days at 11psi and so this evening I pulled the first pint.

ISO Standard Stout, certainly my
best brew to date
It pours a jet black with a large tan head. The head dissipates to leave a thin creamy collar. The aroma is dominated by the roasted malts, with the roasted barley and chocolate malt very much to the fore. Very smooth mouthfeel with a nice creamy characteristic. Medium bodied with a slightly dry finish. The key thing that makes this beer so good is how 'standard' it is, it is really well balanced and at 4% is a really good session beer.

This is the first time that I have used a liquid yeast in my brew and so I would be interested in brewing this with a Danstar Nottingham dry yeast to say what flavour characteristics the Irish Ale yeast contributed.

Very, very happy with this beer, certainly my best brew to date. I would not consider changing the grain bill for future versions (of which there will be many), but I would possibly up the hops slightly and maybe try brewing it with a different yeast.

I will be bringing a few bottles of this to my homebrew meeting next week with the guys from IrishCraftBrewer.com and so it will be interesting to see what they make of it.

Wednesday, June 23, 2010

AG #3 - ISO Standard Stout - Kegging & Bottling

So I finally got around to kegging and bottling my ISO Standard Stout. This beer sat in primary for 11 days, and had fermented down to 1012. Slightly lower than my target gravity of 1014, however this is no harm as it will make the beer less sweet and a little bit dryer. The ABV came in at a very sessionable 4.02% and so this should make a good session beer to have on tap over the coming month.

Due to the fact that in the main I keg my beers, I always find that I do not have any bottles on hand for tastings or to give to friends or family. With this in mind I decided to make a larger brew than I have previously and so after fermentation I had a full 25 litres, this meant that I could fill a corny keg and still have enough for 13 or 14 500ml bottles.

Bottles in an old fermenter getting
the starsan treatment
First thing that needed to be done was to sanitise the bottles and keg I would be using. Many people describe an arduos and multi-step process to cleaning and sanitising their bottles, life is too short, and so I have a pretty simple and easy system. After a bottle has been poured it gets a rinse in cold water to remove any yeast or debris, it then sits in the kitchen until a few bottles have built up, all the bottles then get a wash in the sink with hot water and then they are thoroughly rinsed, drip dried and put away until bottling day. On bottling day they get a quick check to make sure they are clean and then they get the starsan treatment. After being submerged in starsan solution they are emptied and filled straight away. There is no need to rinse the bottles after using starsan, also you will notice there will be some foam left in the bottle from the starsan solution, you don't need to worry about this foam, it will not effect that taste of your beer.

Fill the keg from the bottom in order to
minimise the risk of oxidising the beer.
After all of the sanitation comes the filling of your keg and bottles. On this particular day I had a problem with not having the right tubing to connect to the tap on my fermenter and so I ended up using an auto-syphon and improvising a bottling wand at the end of this. It worked very well and in no time at all I had 13 x 500ml bottles ready to be capped (the caps, capper, bottling wand etc all have to be cleaned and sanitised prior to use). Next was the kegs turn, the end of the syphon tubing is placed at the bottom of the keg and the beer is racked. It is important not to oxidise the beer at this stage and so this is why the end of the tube is placed at the bottom of the keg. Once the keg is full the lid is put on and the keg is given a few bursts of CO2 in order to make sure that the lid forms a proper seal. Once this has been done you can leave the beer to condition for a week or more at room temperature or just place straight in your keggerator. Before force carbonation it is important to leave the keg in the keggerator for a few days before commencing carbonation, as cold beer will carbonate a lot quicker than beer that is at room temperature.

Last but not least it is time to design some labels for my bottles. I was never good at art and so my labels are nothing special, however it adds to the whole process. Here is what I came up for ISO Standard Stout:


Wednesday, June 9, 2010

AG #3 - ISO Standard Stout - Brew day

Brew day for my first ever stout went very well. Full recipe here. I was particularly pleased with this brew day as there were three new elements introduced to my brewing process and I thought I coped well with the changes.

My three tier system
with new mash tun
The first change to my brew day was that I was using a new piece of equipment. Up until now I have been using a BIAB type system that allowed me to mash in a converted fermenter. However due to the fact that this system limited the weight of grains I could use, I decided to purchase a cooler box mash tun from Hop & Grape in the UK. I was worried that I would make some form of error with this however everything went very smootly and I got a decent 75% efficiency which was slightly lower than I would have liked, but not bad for a first attempt.

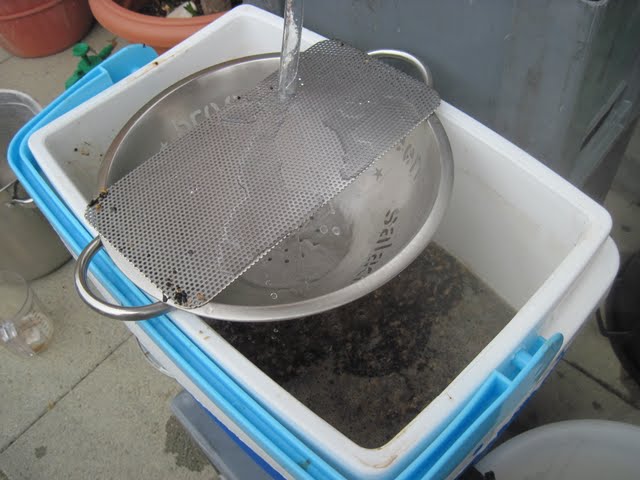
The second change to my brew day was a process change. In my previous two all grain brews I had used a batch sparge method. However on this occasion, due to the fact that I had the new mash tun, I decided to try fly sparging. I found this to be a lot easier to do as you only have the one vorlauf to do and once you get your flow rates equalised you can pretty much leave the sparge to look after itself. It does take more time, but I think I will see a better efficiency as a result of using this method.

Fly Sparging using a perforated SS
plate and a colander to diffuse the
sparge water
The third change I made was that this was the first time that I have used a liquid yeast (WYeast 1084 Irish Ale). This involved making a starter during the week in which I dissolved 200g of DME in 2 litres of water and then brought it all to the boil and maintained the boil for 10 minutes. This was then cooled and placed in a 5 litre plastic container. The yeast was then added and an airlock placed on top. This was then left to ferment for four days. By the time I got around to making this brew the starter had fermented out and the yeast had formed a nice cake on the bottom. This yeast was then pitched directly into the wort. Due to the fact that this was the first time I had made a yeast starter I am hoping I did everything right, fingers crossed I get some fermentation activity in the next 24 hours or so.

I know that using liquid yeast offers you a much greater range of yeast than is availble in dry form. However I have to say that wherever possible in the future I will use a dry yeast as I thought the amount of effort in creating a yeast starter was a bit too much hassle. In my previous eight or nine brews I have used dry yeast and never had any problems with it.

AG #2 Update - I have moved my Steam Punk ale into the fridge after a week of conditioning at room temperature, I will leave this for a few days and then force carb for 3-4 days, should be ready for a first taste test by the weekend.

Wednesday, June 2, 2010

AG #3 - ISO Standard Stout

Hoping to brew this up at the weekend. It is based on a recipe from O'Flainnegain over on HomeBrewChatter.com. This will not only be my first time brewing a stout, it will hopefully also be my first time using my new mash tun (if it gets delivered before the weekend!).

Standard Stout

13-B Sweet Stout
Author: O'Flainnegain/Mark

BeerTools Pro Color Graphic

Size: 23.04 L
Efficiency: 75%
Attenuation: 75.0%
Calories: 155.11 kcal per 12.0 fl oz
Original Gravity: 1.047 (1.044 - 1.060)
Terminal Gravity: 1.012 (1.012 - 1.024)
Alcohol: 4.59% (4.0% - 6.0%)
Bitterness: 20.6 (20.0 - 40.0)

Ingredients:
3270.0 g Maris Otter
550.0 g Barley Flaked
550.0 g Carapils®/Carafoam®
415.0 g Roasted Barley
275.0 g Chocolate 1060 EBC
38.0 g Goldings (5.0%) - added during boil, boiled 60 min
1.0 tsp Irish Moss - added during boil, boiled 15 min
1.0 ea WYeast 1084 Irish Alea